Western blot analysis can detect one protein in a mixture of any number of proteins while giving you information about the size of the protein. It does not matter whether the protein has been synthesized in vivo or in vitro. This method is, however, dependent on the use of a high-quality antibody directed against a desired protein. So you must be able to produce at least a small portion of the protein from a cloned DNA fragment. You will use this antibody as a probe to detect the protein of interest. Western blotting tells you how much protein has accumulated in cells. If you are interested in the rate of synthesis of a protein, Radio-Immune Precipitation (RIP) may be the best assay for you. Also, if a protein is degraded quickly, Western blotting won't detect it well; you'll need to use (RIP). See the section on RIP for more information, as well as a helpful comparative chart that illustrates the differences between these two techniques.
Let's look at this technique in greater detail.

- Separate the proteins using SDS-polyacrylamide gel electrophoresis (also known as SDS-PAGE). This separates the proteins by size.
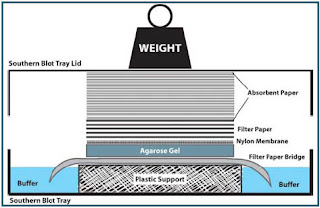
- Place a nitrocellulose membrane on the gel and, using electrophoresis, drive the protein (polypeptide) bands onto the nitrocellulose membrane. You want the negative charge to be on the side of the gel and the positive charge to be on the side of the nitrocellulose membrane to drive the negatively charged proteins over to the positively charged nitrocellulose membrane. This gives you a nitrocellulose membrane that is imprinted with the same protein bands as the gel. One thing to be aware of is that proteins bind better to nitrocellulose at a low pH. You may need to go through some trial-and-error to find the optimal pH. You also need to be sure there are no air bubbles between the nitrocellulose and the gel or your proteins will not transfer.
- Incubate the nitrocellulose membrane with a primary antibody. Click here to find out more about how to make a primary antibody. The primary antibody, which is the specific antibody mentioned above, sticks to your protein and forms an antibody-protein complex with the protein of interest. Milk does a blotting good An item to remember here is that antibodies are also proteins, and that proteins like to bind to nitrocellulose. So before you add your primary antibody, be sure to mask the nitrocellulose by incubating it in a blot. One of the best blotting agents around is Carnation Nonfat Dry Milk. Don't go for the generic to save a few pennies, only this brand will do. Nobody seems to know why Carnation works so well, but it does.
- Incubate the nitrocellulose membrane with a secondary antibody. This antibody should be an antibody-enzyme conjugate. The secondary antibody should be an antibody against the primary antibody. This means the secondary antibody will "stick" to the primary antibody, just like the primary antibody "stuck" to the protein. The conjugated enzyme is there to allow you to visualize all of this. It's kind of like a molecular flare stuck on the antibodies so you can visualize what s going on.
- To actually see your enzyme in action, you'll need to incubate it in a reaction mix that is specific for your enzyme. If everything worked properly, you will see bands wherever there is a protein-primary antibody-secondary antibody-enzyme complex, or, in other words, wherever your protein is.
- Put x-ray film on your gel to detect a flash of light, which is given off by the enzyme. The reaction usually runs out in about an hour.
Making a primary antibody
This description assumes you have available purified protein. Run the protein on an SDS-PAGE gel. Stain the gel with KCl. The KCl forms a precipitate with the SDS. Since the area with the protein has a low concentration of SDS, the area with the protein will not show a precipitate. This will allow you to see the protein band as a clear band against a milky white precipitate on the rest of the gel. Carefully cut out the band and soak it in 1 mL PBS buffer. Crush it and make an emulsion with 1 mL Freund's Complete Adjuvant (which is an oily substance). The complete adjuvant contains microbacteria (an immune stimulant) to increase the immune response. Inject this subscapularly into a rabbit. This is your first inoculation. Only use the complete adjuvant for the first inoculation. NEVER inject a rabbit with complete adjuvant more than one time.
Rest the rabbit for one month, then repeat the process using an incomplete adjuvant. You can expect to see good antibody titers about 10 days after the second booster. Bleed the rabbit. You can expect about 30 to 40 mL per bleeding, and about 50 percent of the volume is serum. Now you have rabbit antisera. To get your primary antibody, dilute the rabbit antisera in blotto (aka Carnation Nonfat Dry Instant Milk) and apply it to your nitrocellulose blot. Make sure you dilute 1:500 to 1:100 in blotto; less dilution will give you background binding and really muddy up your results.
Secondary antibody
This is much easier than the procedure for the primary antibody. Grab a catalogue and look for a goat-anti-rabbit antibody conjugated to horseradish peroxidase (HRP). The goat-anti-rabbit is your secondary antibody (the one that "sticks" to the primary antibody) and the HRP is the conjugated enzyme that will allow you to visualize your protein.


0 comments:
Post a Comment